iZoner
![]()
|
iZoner
|
|
|
Important information iZoner running under iOS7 is causing a long delay while switching mode.
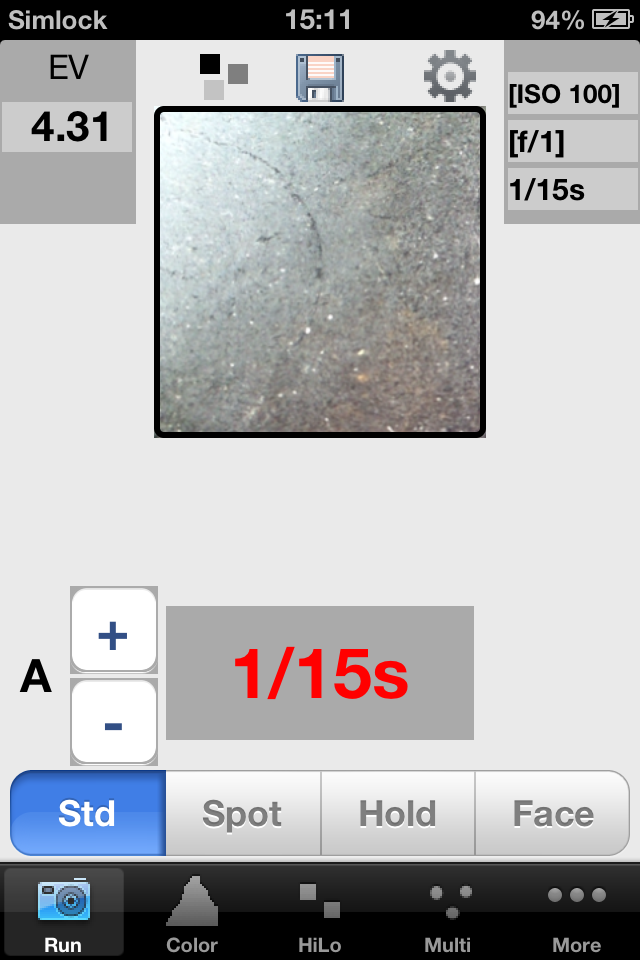
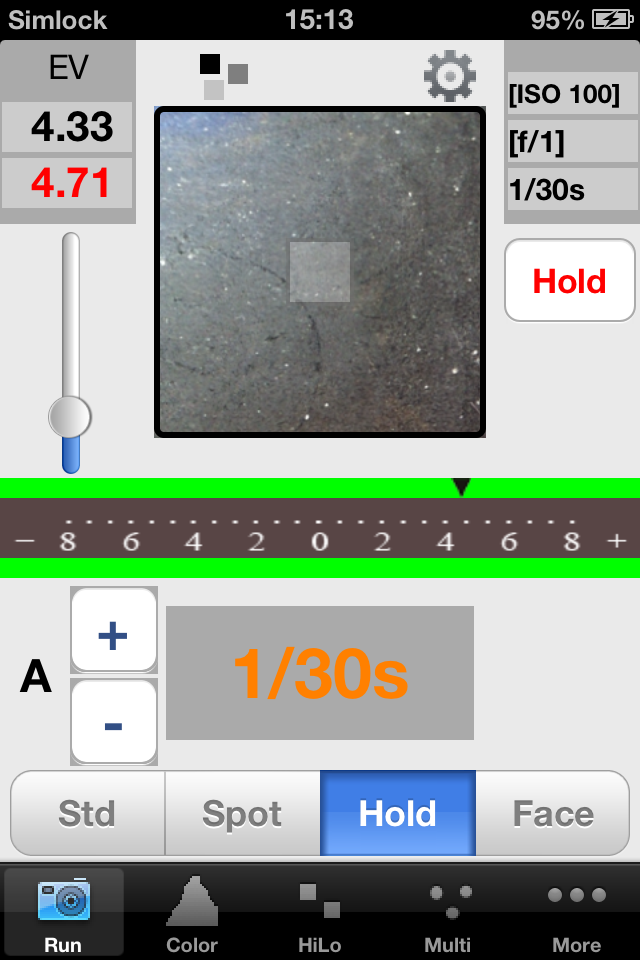
General information iZoner turns your iPhone into a exposure metering piece of equipment. In the following explanations not all possibilities are given, there are more combinations of settings possible. This manual is valid for V3.00 Run in standard mode with aperture priority
This is one of the two automatic modes, the other one is shutter or time
priority. In the center view you will see a square picture where you are pointing at. In the upper left corner, the average (calculated over the square view)
exposure value is shown. Left of the calculated shutter speed value there is a small vertical stepper.
This stepper enables you to adjust the chosen aperture, without switching to
the settings page. The small wheel starts the setup screen, the small 3 black/grey blocks opens
the ND/grey filter setting. When you use a filter with known density on your
camera you can add this to iZoner. The center icon can be a diskette or printer
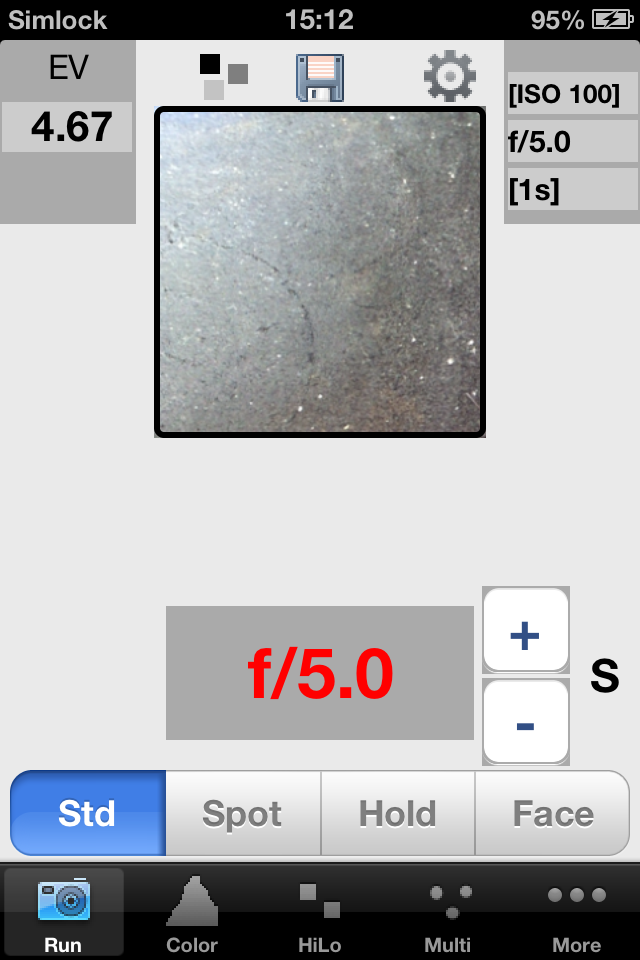
with or without cross, this is the saving and printing setup. Run in standard mode with shutter speed priority
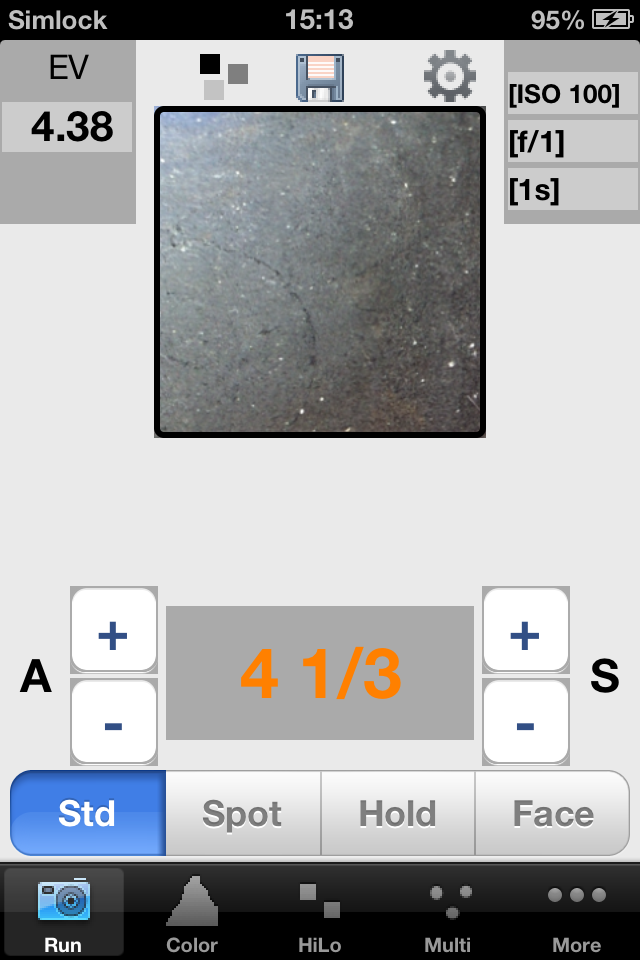
This mode is almost the same as the previous. In stead of the aperture the shutter speed is selected and the correct aperture is calculated. Run in standard mode with manual exposure
In manual exposure mode you select both aperture and shutter speed and iZoner
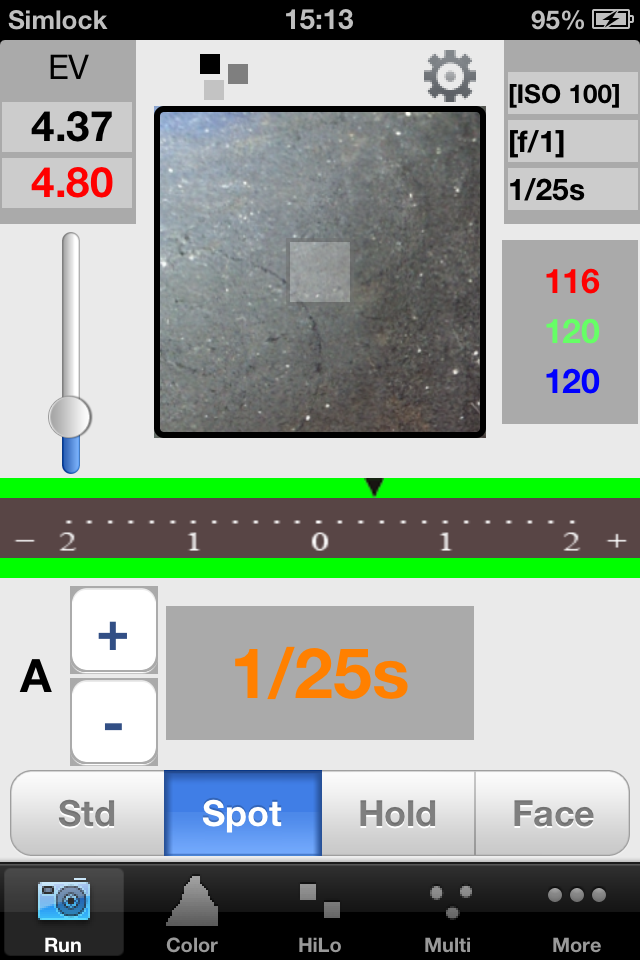
calculates the average under- or overexposure. Run in spot metering mode with aperture priority
In the spot modes the correct exposure is calculated for the spot, not for the whole image. In the upper right corner the correct exposure (depending on the priority settings) is displayed. In the upper left corner both the average for the image and for the spot the exposure value is shown. In the center bar, the small black triangle indicates the under- or over exposure of the spot compared to the image. The scale is automatically adjusted or can be fixed in the settings view. Left from the camera view the small slider can be used to change the spot size. At the right side of the image you see three colored numbers, these represent the color distribution on the selected spot. Be aware of the effect of the reflecting surface and the used light source(s). Run in hold spot metering mode with aperture priority
Just right of the camera view is a button "hold". When you point the spot at an object and press hold, the exposure value of the spot is stored and displayed in the button. When you move the camera view, the current spot is compared to the stored spot. This gives you the opportunity to compare different parts of a scene. When you want a new reference spot, just press the button again when pointing at the new one. As before, the indicator in the upper right corner shows the correct exposure for the current spot. Run in face tracking mode
Sometime you want to perform spot metering on the main subject, the face. With this mode you can under certain circumstances use this mode. The OS is capable of tracking the recognized face. If this is detected the spot is made in this area. This unfortunately only works if two eyes and a mouth are detected in sufficient light. Settings
This view is used for setting up your iZoner (the aperture and shutter speed can also be adjusted in the run screen). The settings screen can be accessed by the small icon on top of many screens or by the tabbar under more... Exposure mode:
Depending on the exposure mode the colored row titles in the picker are changed. Exposure scale: The exposure scale for spot metering etcetera can be automatically adjusted (A) or fixed to a defined under- and overexposure. The preferred setting depends on the scene and the changes in the scene. Adjust EV to ISO: The disabled mode is useful for most circumstances, all metered values are calculated relative to ISO100. When enabled the EV-scale is transposed according the selected sensitivity (ISO). There are cameras that need this setting. When you double the ISO the EV values in incremented by 1 etc. ISO/Aperture/Speed: This picker let you select the parameters for metering. If the header is red
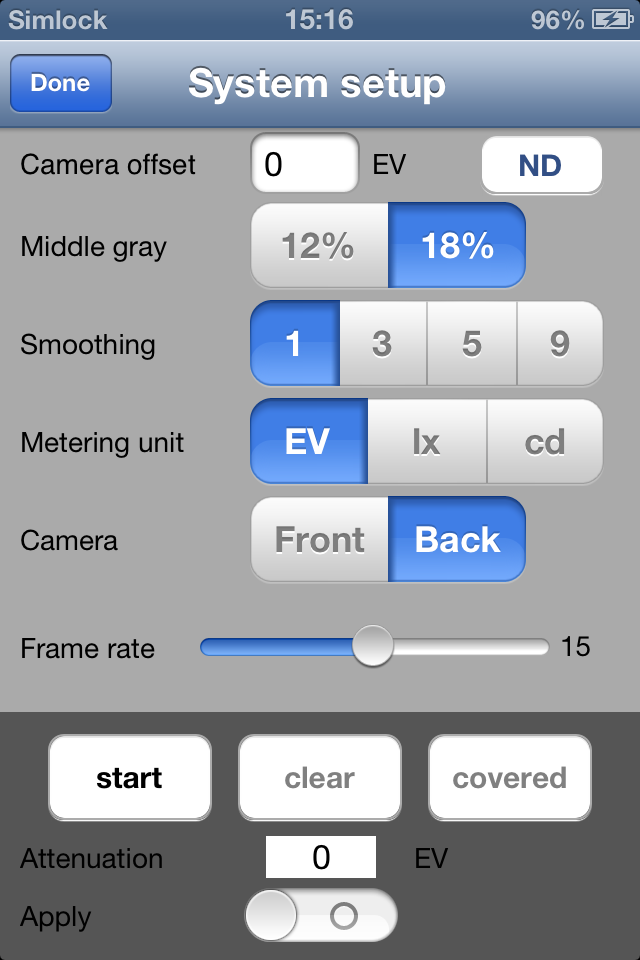
the selected value is not used, but the appropriate value is calculated. System settings
Camera offset: The camera in your iPhone is very good and its exposure measurement also, but
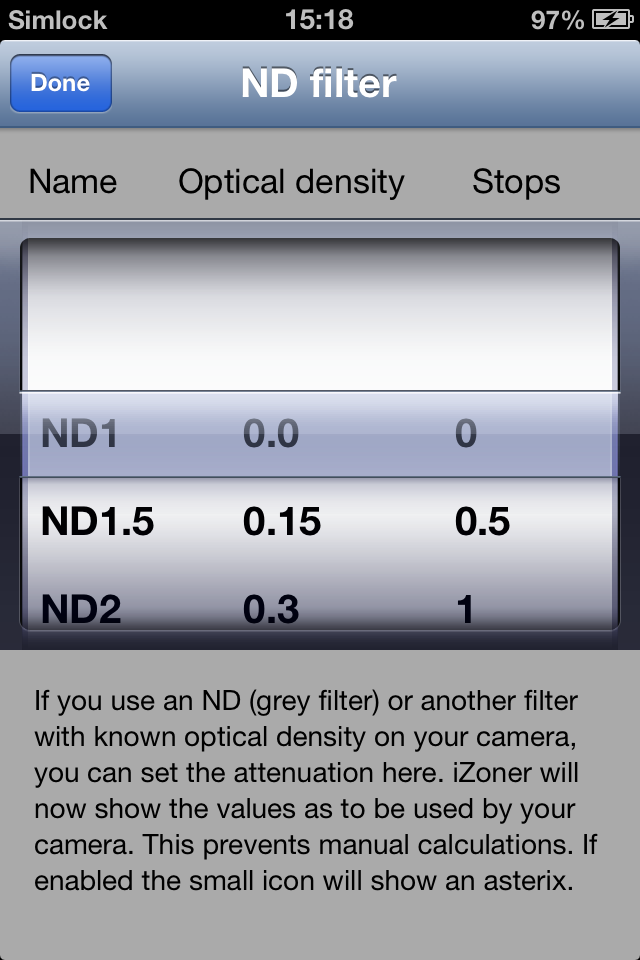
every camera (system) has it own characteristics and preferences. ND button: The ND button opens the ND/grey filter setting. When you use a filter with
known density on your camera you can add this to iZoner.
Middle gray: Traditionally 18% gray is considered as the reference value for exposure meters. The total picture is summed and the exposure (aperture/speed/ISO) is adjusted to fulfill this value. You can also take a metering on your hand or on the sidewalk stones, they are also "18% gray". Nowadays more and more cameras are using a value more close to 12%, it is up to you what you like in metering. Smoothing: In the next view histogram graphs are drawn. These histograms can have very narrow spikes. When you select a value not equal to 1, these histograms are using a averaging algorithm over 3/5/9 samples. The graphs look smoother. Metering unit: Standard for photography the EV is used as unit. If required lux or candela can be selected. Camera: Under certain circumstances it might be convenient to switch to the camera on the opposite side, select it here. With this possibility you can use iZoner also for incident light. To perform metering like this, you can use the lower part of this screen. Frame rate: The maximum frame rate iZoner can handle depends on the iOS version but even more on the hardware. The iPhone5 is about 3 times as fast as an iPhone4. The higher the selected frame rate, the more responsive and smooth the camera view will be. The drawback is higher rates requires more CPU power, draining the battery at higher speed. Take also care that the temperature of your iPhone can increase. A good average (and close to the max for a iPhone4) is 10 to 15 frames per second. To calibrate for some piece of material for incident measurement, first press start while aiming your selected camera at a large evenly illuminated object. Then press on the clear button. Wait a second and put the diffusing material in from of your camera, aiming at the same object. Now press the covered button, the attenuation of the material will be defined. If the apply switch is enabled, all calculations use the attenuation for calculations Color
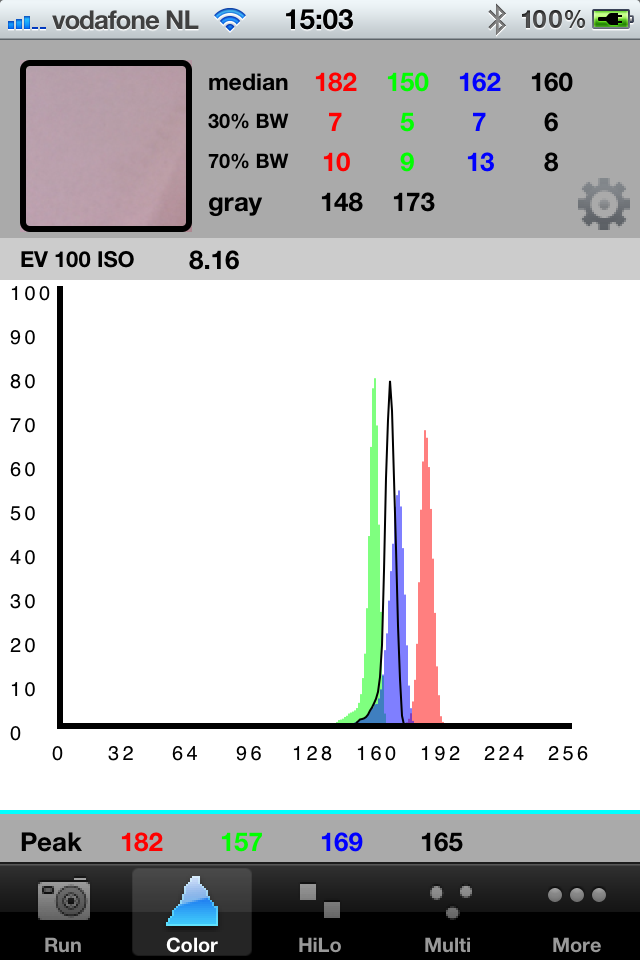
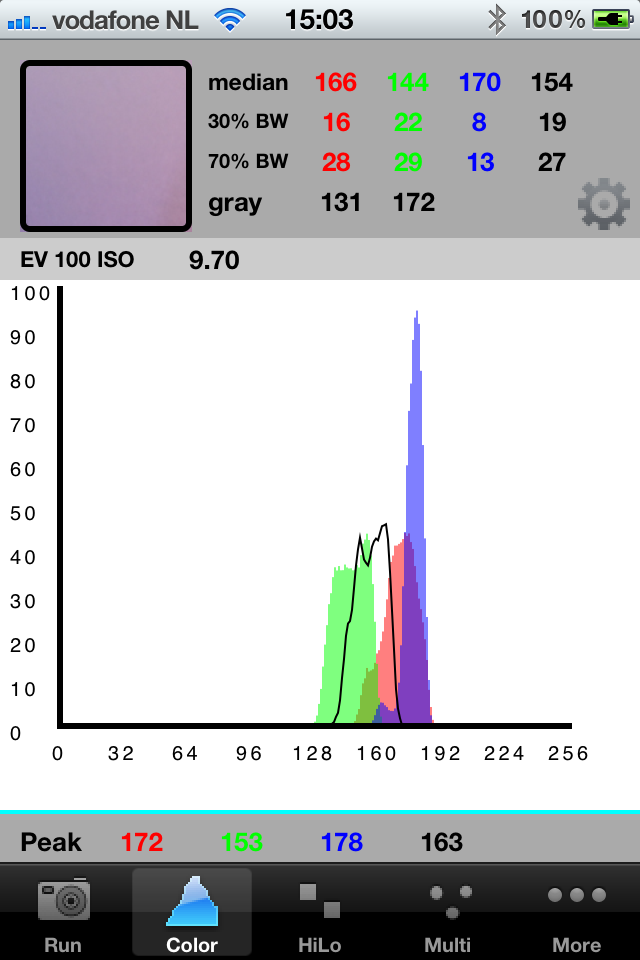
This view is the most difficult to explain, but contains for the eager
photographer lots of information. In the upper left corner the live view of the camera is visible (here a 18%
gray card is measured). When you take a picture with your camera, using this light setup, there will
be a color cast in your photo. To do this test, even a white piece of paper will work (as long as there is no color in it). If you think the image is constantly changing in brightness, you can freeze it by tapping on the picture. Tapping again starts the live view.
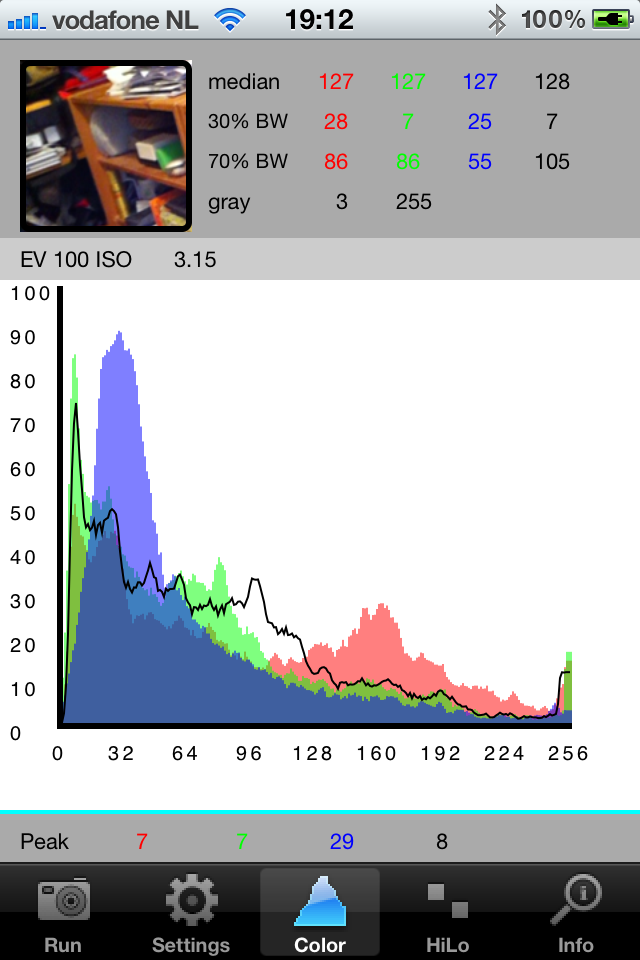
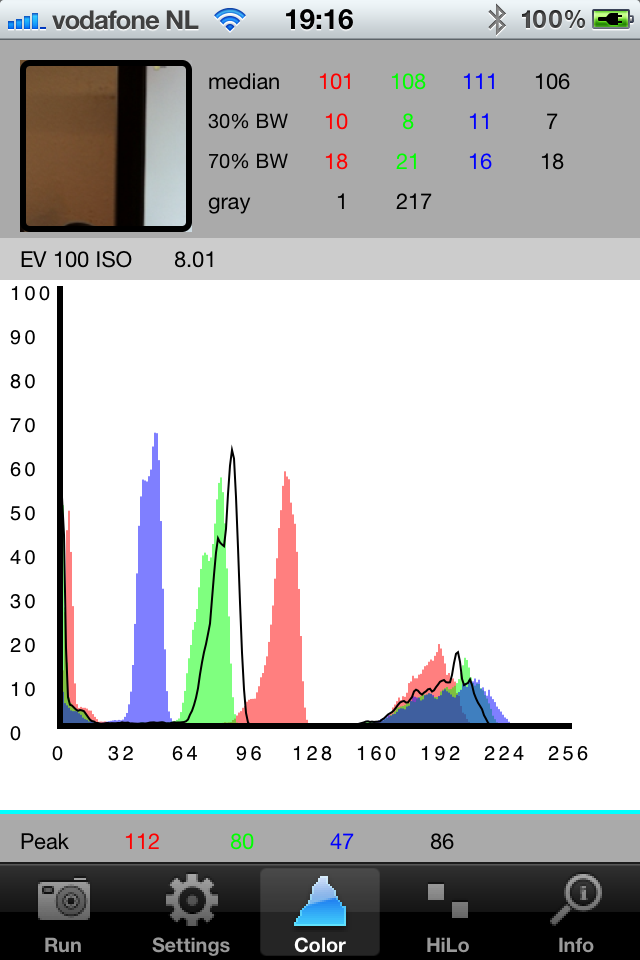
What do we see here?
Just one more last example. To get more feeling with this view and learn to see colors/tones, you can try lots of different scenes while waiting at the doctors or dentists. On this view there are some figures to help you.
median: the middle between the lowest and highest value for a colorchannel HiLo
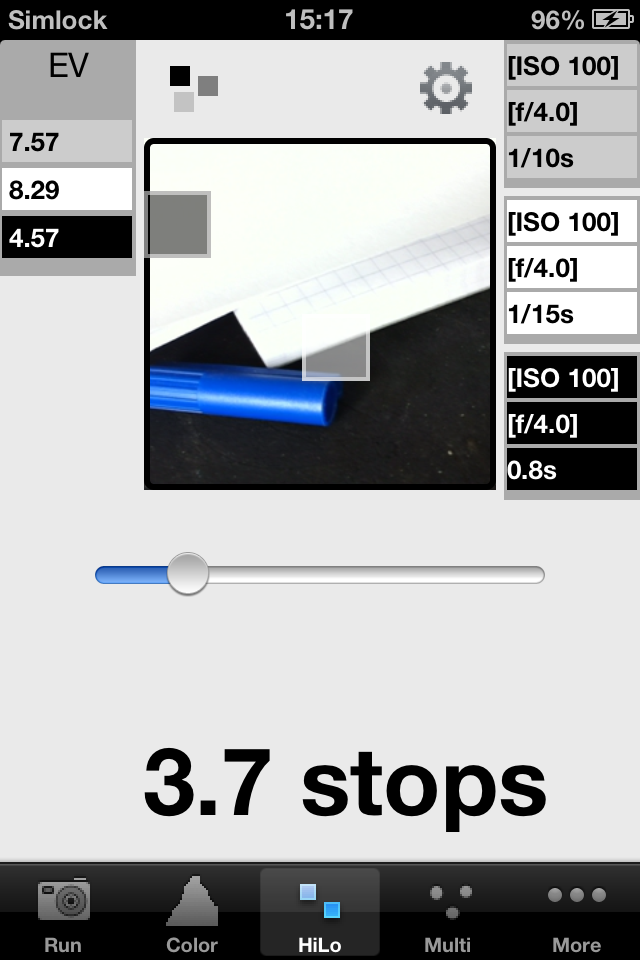
This view shows a live image with two small square spots. The darker indicates
the spot with the highest gray value, the lighter the spot with the lowest gray
value. The figure below the slider shows the difference in stops between these two spots. This value is limited by the dynamic range of the iPhone. In the left upper corner the average (gray), highlight (white) and lowlight (black) EV values. In the upper right corner the color are corresponding these values. The displayed values are like the standard mode under the first tab, i.e. the calculated values according the presets. If you set for instance your camera according the black (lower light) value, this part of the scene will be at 18% grey, the others are relative to this setting. In the manual mode the white and black value only shows the offset relative to the manual preset. This preset should be in a way that the white value has a positive and the black value has negative value. Now you have dark and highlight in your settings. Multi
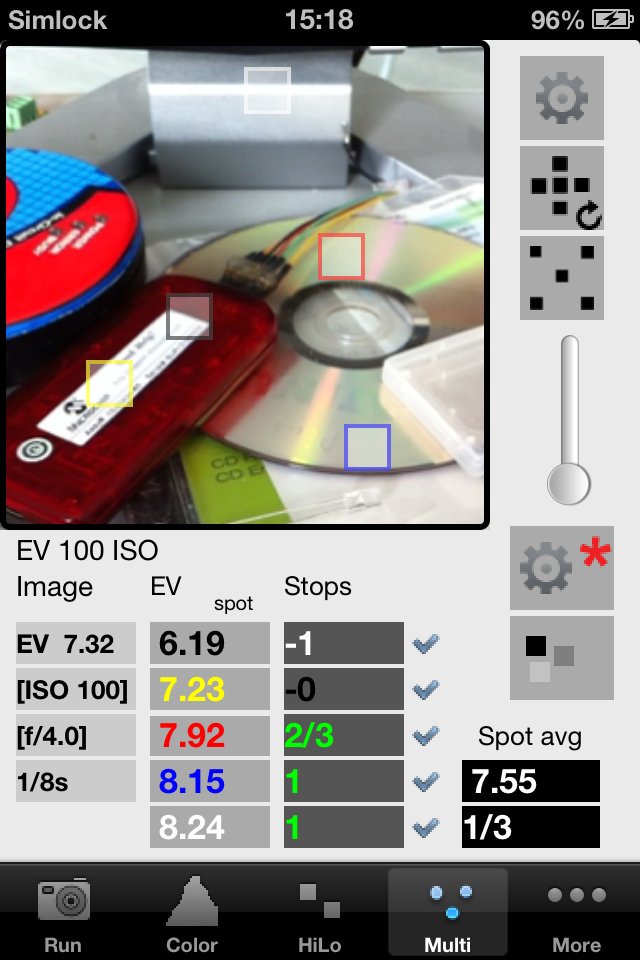
This view shows a live image with 5 small square spots. Each spot has a
different color, corresponding to the shown values in the lower part of the
screen. When you point at a spot, it is possible to drag it all over the screen The figures below the slider show several values:
Just right the spot stops the can be a small OK sign. If it is shown, this spot is used in the averaging. The result of this averaging in exposure value and stops is shown in the most right black fields. The upper button is the well-known setup button. The second button is there to let you set the spots to their original position. The next button creates the maximum spread over the screen.
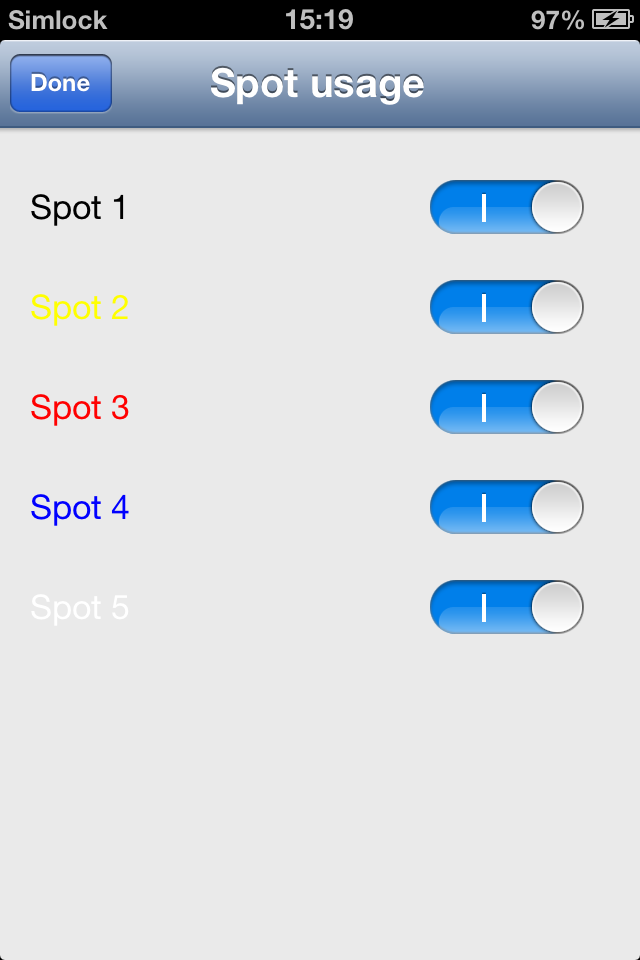
Just below the slider, the one to adjust the spot size, there is a setup plus button. When pushed, a screen opens where you can en- and disable the spots for averaging. Save and print
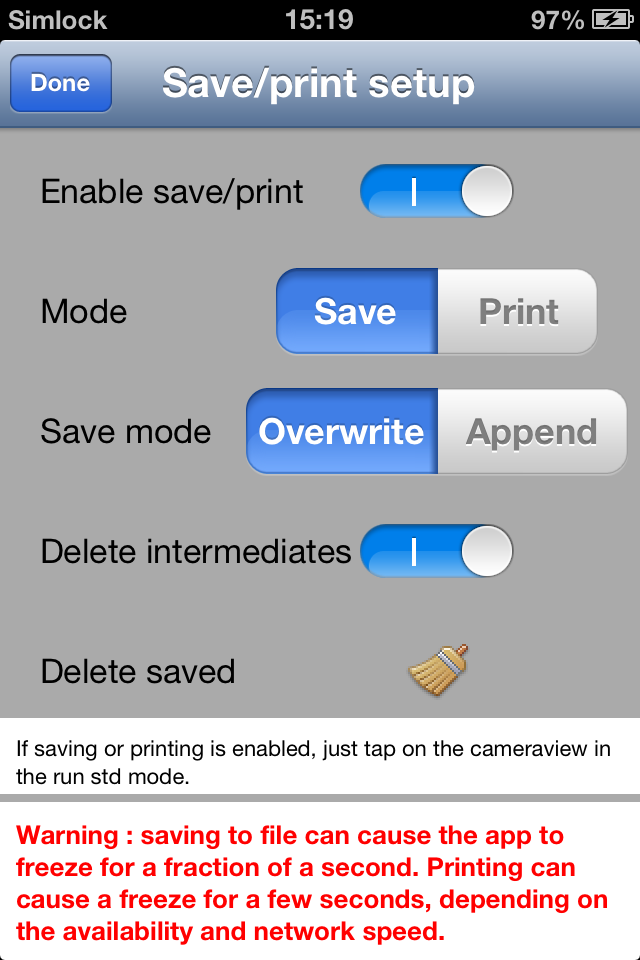
This page sets the save and print options. The save and print option is only
available in the standard run mode. Clicking on the small icon in the middle
opens this setup menu. The first switch is used to en- or disable the option,
the icon on the run screen will change accordingly. When enabled, saving is done
by tapping the camera view in the run-standard mode. When you select overwrite, every time you tap the camera view, the new file(s) will overwrite the old and previous one(s). In the append mode every tap will create a new set of files with a unique time stamp in the name. Doing this very often without deleing them will cost a lot of storage. When tapped a set of three files will be created: an image, an XML data file and a PDF. The latter is the normal user file that can be printed. The XML file can be used by users with advanced knowledge and is internally used to create the PDF. For everyday use you can select to delete the first to "temporary" files, only the PDF is saved (with a new name or overwriting). The 3 files can be transferred with iTunes. After playing around there might be lots of files in the map. You can either delete them with iTunes or use the "Delete saved" button. Be careful: all saved files including the PDFs are permanent deleted.
|
|
U kunt een e-mailbericht met vragen of opmerkingen over deze website
verzenden aan
alex@ak-beheer.nl.
|
![[In aanbouw]](images/undercon.gif)